> ## Documentation Index
> Fetch the complete documentation index at: https://docs.prequel.co/llms.txt
> Use this file to discover all available pages before exploring further.
# Redshift serverless
> Connect your Redshift Serverless workgroup as a source
Redshift Serverless issues temporary database credentials per workgroup, so the connection involves two identities:
* A **Redshift database user** in your workgroup. You create this read-only user in Step 3. It owns the schema and table privileges needed to read your data.
* An **AWS IAM role or access keys** in your AWS account. You configure this in Step 5. It holds the permission to call `redshift-serverless:GetCredentials` on your workgroup and the S3 permissions used to stage data during a sync. We use this identity to obtain short-lived database credentials, so no long-lived database password is required.
## Step 1: find workgroup connection details
1. In the Redshift console, click **Workgroups**.
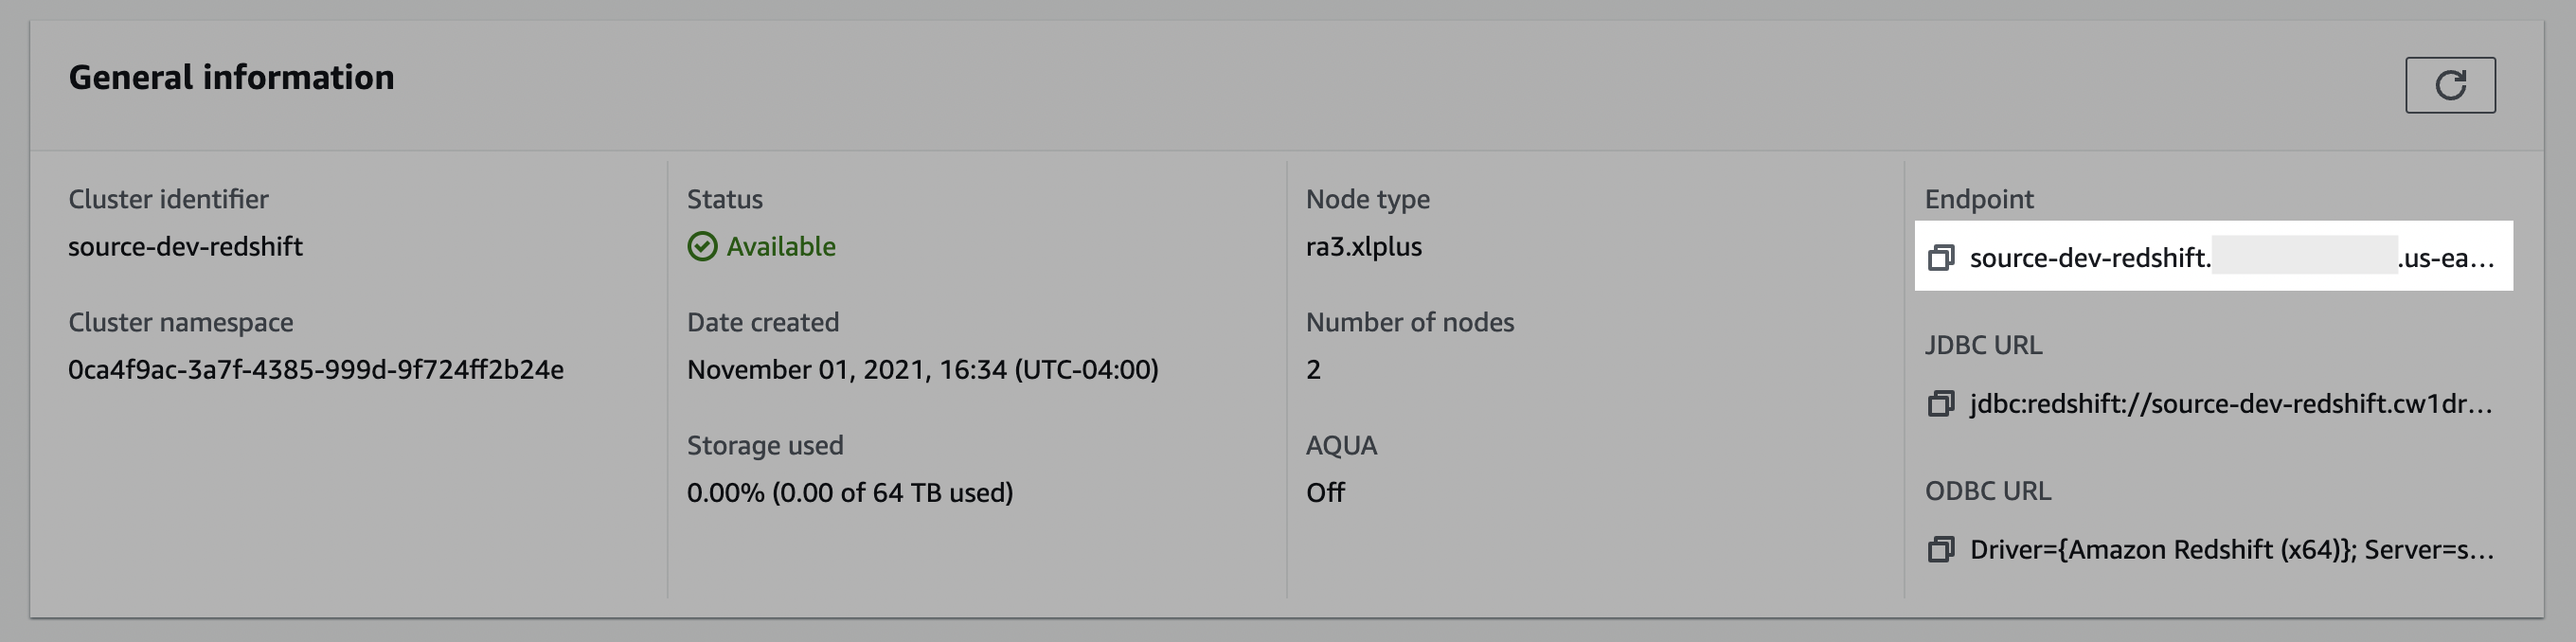
2. Select the workgroup you would like to connect, and make note of the **workgroup** name.
In the **General information** pane, make note of the **Endpoint** details and the **AWS region** that the workgroup is hosted in. You may need to use the **copy** icon to copy the full details to discover the full endpoint and port number.
## Step 2: whitelist connection
1. In the Redshift console, click **Workgroups**.
2. Select the workgroup you would like to connect.
3. Click the **Properties** tab.
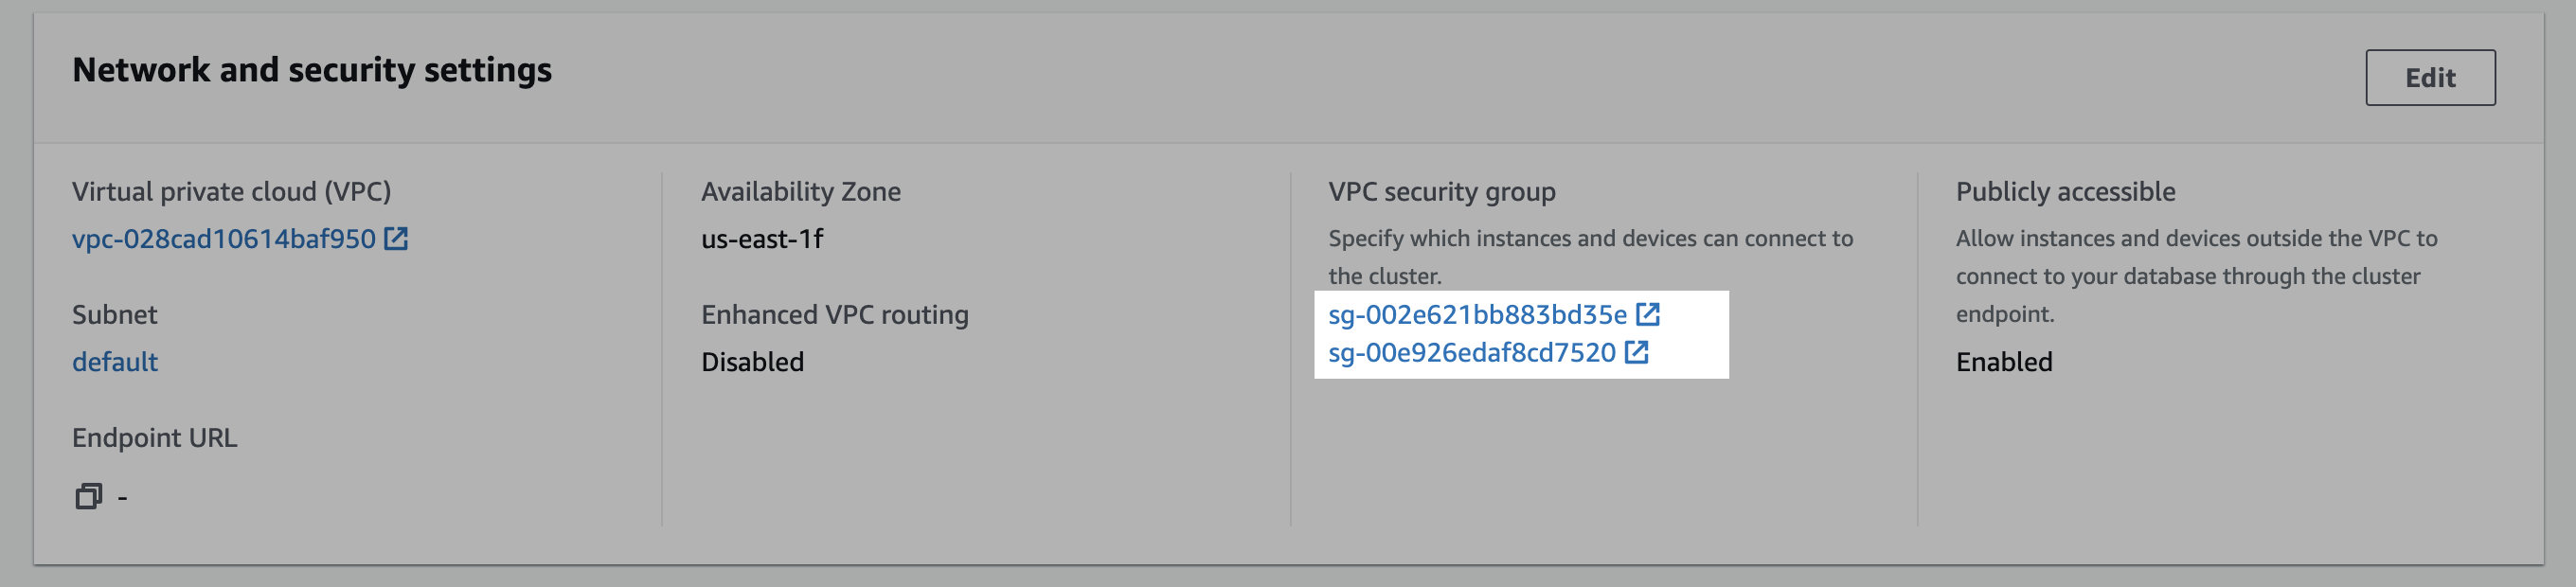
4. Scroll down to the **Network and security settings** section.
5. In the VPC security group field, select a security group to open it.
1. In the Security Groups window, click **Inbound rules**.
2. Click **Edit inbound rules**.
3. In the Edit the Inbound rules window, create a custom TCP rule for the static IP:
1. Select **Custom TCP** in the drop-down menu.
2. Enter your Redshift port number (likely `5439`).
3. Enter the static IP address.
4. Click **Add rule**.
## Step 3: create a limited user
Connect to your Redshift Serverless workgroup using the SQL client.
Execute the following query to create a user. Because authentication uses temporary credentials issued by `redshift-serverless:GetCredentials`, a password is not required and the user can be created with `PASSWORD DISABLE`.
```sql title="Create user" icon="database" theme={null}
CREATE USER PASSWORD DISABLE;
```
Execute the following query to grant the user read-only privileges (replace `` with your schema name):
```sql title="Grant read-only access" icon="database" theme={null}
GRANT USAGE ON SCHEMA TO ;
GRANT SELECT ON ALL TABLES IN SCHEMA TO ;
```
## Step 4: create a staging bucket
Redshift Serverless reads use the high-throughput `UNLOAD` path, which stages data in an S3 bucket in your account before it is read. Files are cleaned up automatically after each sync.
1. Navigate to the S3 service page.
2. Click **Create bucket**.
3. Enter a **Bucket name** and modify any of the default settings as desired. **Object Ownership** can be set to **ACLs disabled** and **Block Public Access settings for this bucket** can be set to **Block all public access** as recommended by AWS. Make note of the bucket name and AWS region.
4. Click **Create bucket**.
You may configure a lifecycle rule on the staging bucket to automatically delete objects older than two days, as the bucket is not used to persist data. In the bucket **Management** tab, click **Create lifecycle rule** and set an expiration action for current versions of objects with a two-day age. Sync logic cleans up files after each sync completes, so this is an optional step.
## Step 5: configure AWS authentication
You must provide AWS credentials for workgroup access. You can authenticate with either an **IAM role** (recommended) or **AWS access keys**. In both cases, the identity needs permission to call `redshift-serverless:GetCredentials` on your workgroup and to read, write, and delete objects in the staging bucket from Step 4.
In the AWS IAM console, create a new policy with the JSON below. Replace `REGION_NAME`, `ACCOUNT_ID`, and `WORKGROUP_NAME_OR_ID` with values that match your workgroup, and replace `BUCKET_NAME` with the staging bucket from Step 4.
The first bucket permission applies to `BUCKET_NAME`, whereas the second applies only to the bucket's contents at `BUCKET_NAME/*`. This is an important distinction.
```json title="IAM policy" icon="brackets-curly" expandable theme={null}
{
"Version": "2012-10-17",
"Statement": [
{
"Effect": "Allow",
"Action": [
"redshift-serverless:GetCredentials"
],
"Resource": [
"arn:aws:redshift-serverless:REGION_NAME:ACCOUNT_ID:workgroup/WORKGROUP_NAME_OR_ID"
]
},
{
"Effect": "Allow",
"Action": "s3:ListBucket",
"Resource": "arn:aws:s3:::BUCKET_NAME"
},
{
"Effect": "Allow",
"Action": [
"s3:PutObject",
"s3:GetObject",
"s3:DeleteObject"
],
"Resource": "arn:aws:s3:::BUCKET_NAME/*"
}
]
}
```
In the AWS IAM console, create a new role using the custom trust policy below, and attach the permissions policy you created in the previous step. Reach out to your contact for the value of ``.
```json title="Trust policy" icon="brackets-curly" expandable theme={null}
{
"Version": "2012-10-17",
"Statement": [
{
"Effect": "Allow",
"Action": [
"sts:AssumeRoleWithWebIdentity"
],
"Principal": {
"Federated": "accounts.google.com"
},
"Condition": {
"StringEquals": {
"accounts.google.com:sub": ""
}
}
}
]
}
```
After the role is created, copy its **ARN** (for example, `arn:aws:iam::123456789012:role/source-redshift-serverless`). You will provide this ARN in Step 6.
In the AWS IAM console, create a new policy with the same JSON shown in the IAM role tab, granting `redshift-serverless:GetCredentials` on your workgroup and the S3 permissions on your staging bucket.
In the AWS IAM console, create a new user with programmatic access, and attach the policy you created in the previous step.
Generate an access key pair for the user. Make note of the **access key ID** and the **secret access key**. You will provide these values in Step 6.
## Step 6: submit your connection details
Provide the following details to complete the source setup:
1. The **name** is a descriptive name of the source.
2. The **workgroup** name from Step 1.
3. The **host** (e.g., `workgroup.123456789.us-east-1.redshift-serverless.amazonaws.com`).
4. The **port** \[e.g., `5439`].
5. The **database** for your Redshift Serverless workgroup.
6. The **username** from Step 3.
7. The **S3 bucket name** and **S3 bucket region** from Step 4.
8. The authentication credentials from Step 5:
* If using an **IAM role**: the **IAM role ARN**.
* If using **AWS access keys**: the **AWS access key ID** and the **AWS secret access key**.