> ## Documentation Index
> Fetch the complete documentation index at: https://docs.prequel.co/llms.txt
> Use this file to discover all available pages before exploring further.
# Databricks
> Configuring your Databricks destination.
## Prerequisites
* By default, this Databricks integration makes use of Unity Catalog data governance features. You will need Unity Catalog enabled on your Databricks Workspace.
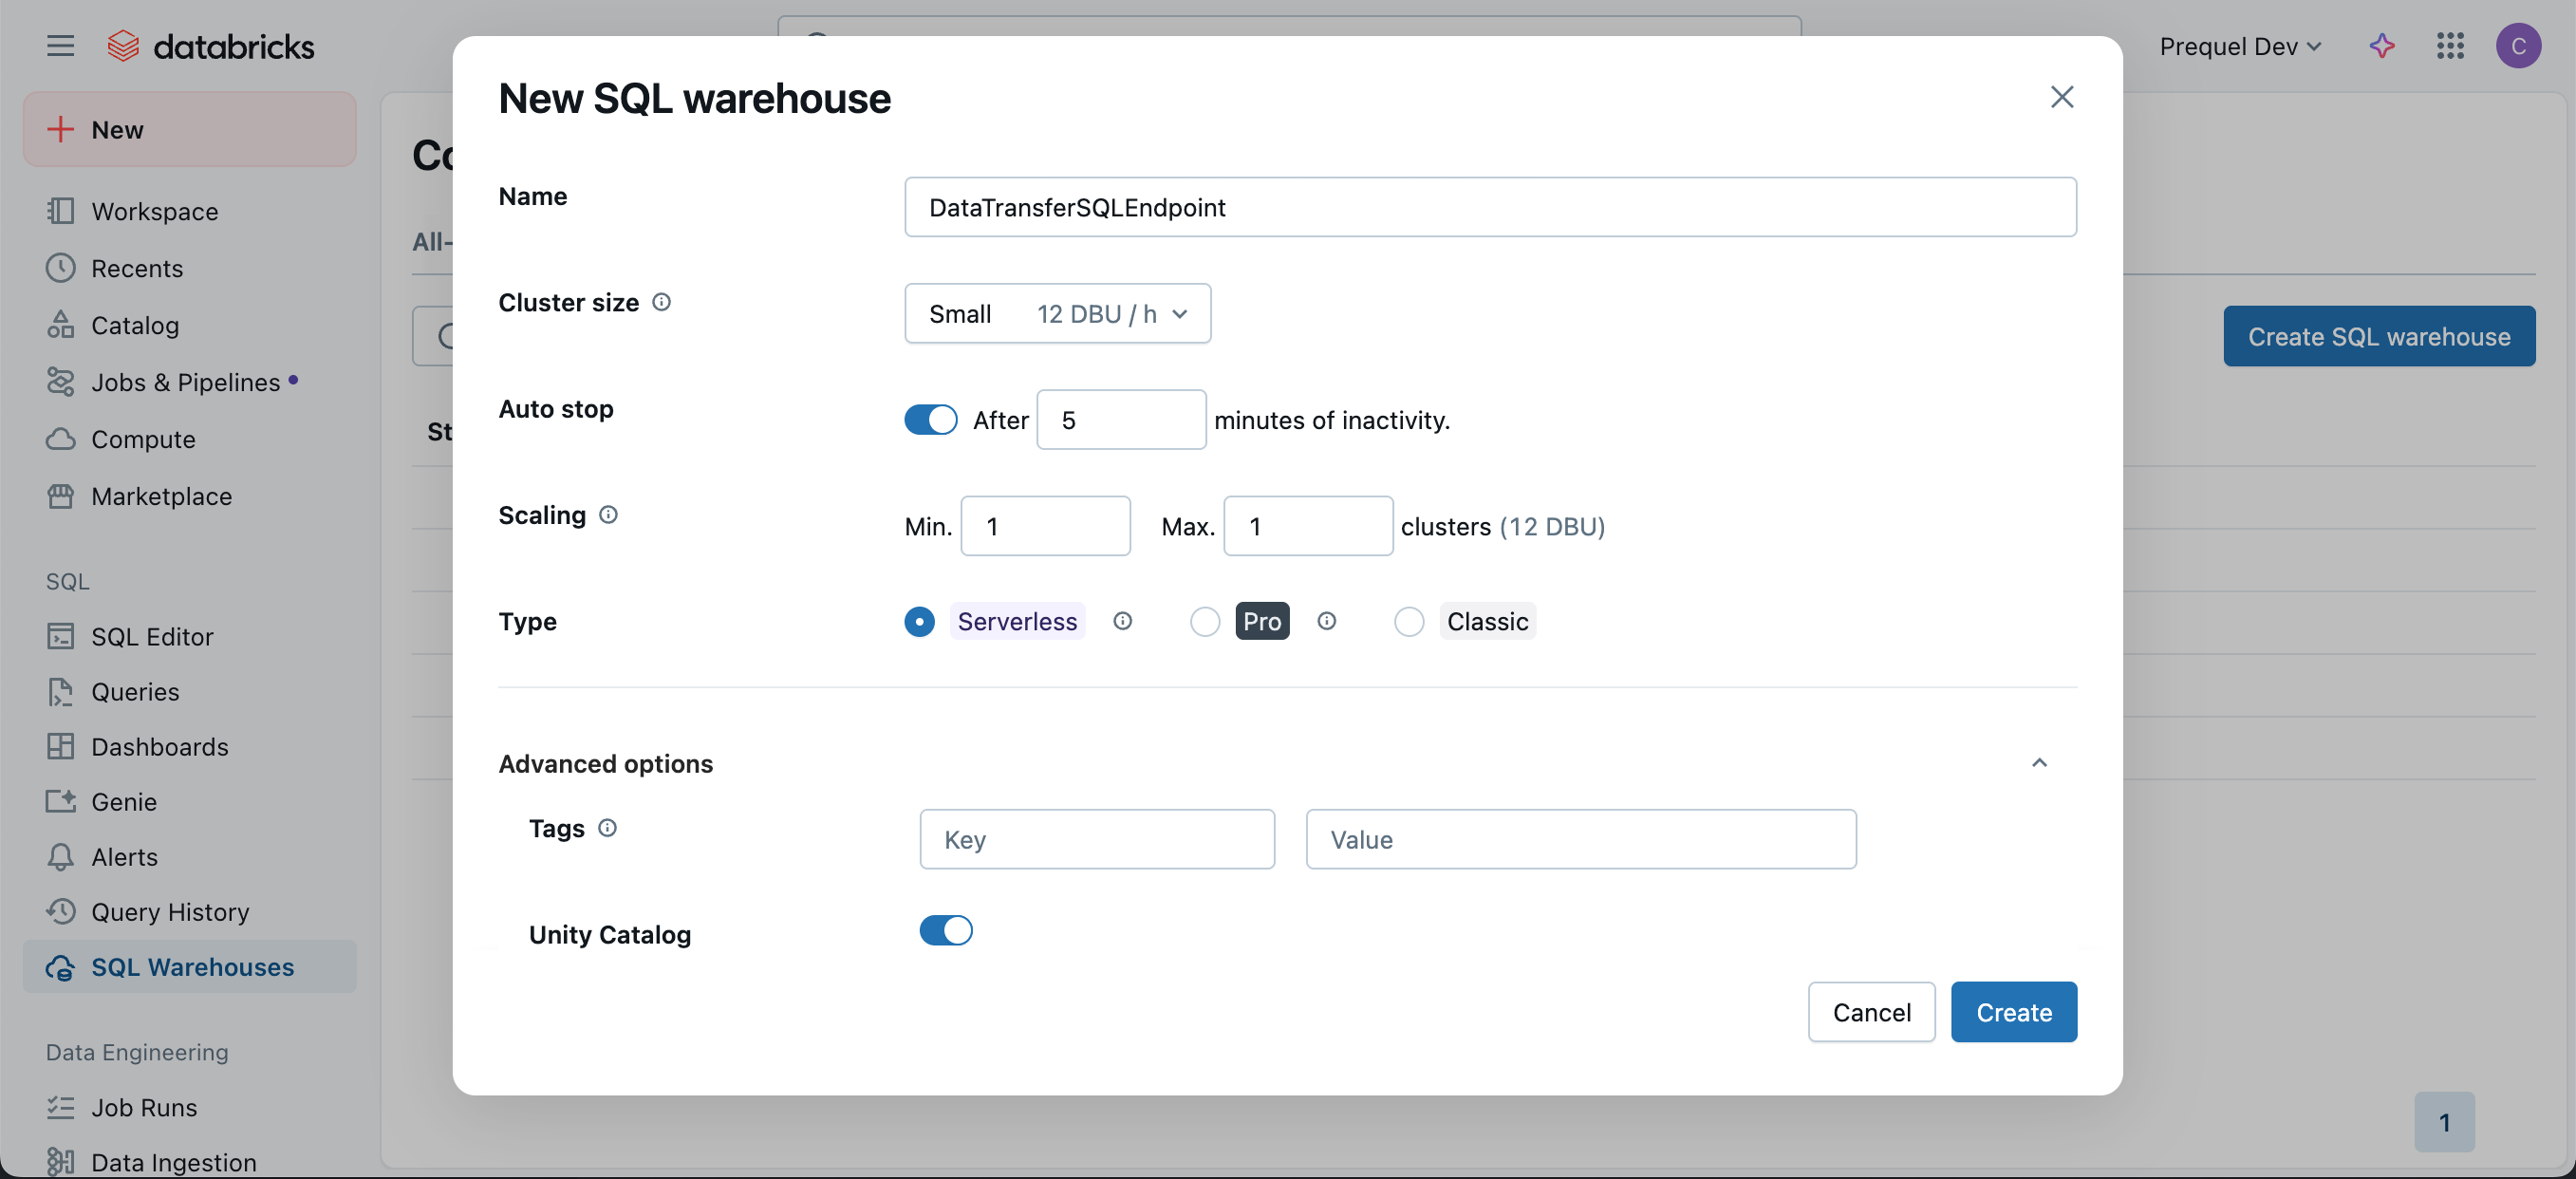
Create a new SQL warehouse for data writing.
1. Log in to the Databricks account.
2. In the navigation pane, click **SQL Warehouses**.
3. In the SQL Warehouses console, click **Create SQL Warehouse**.
4. In the **New SQL Warehouse** menu, choose a **Name** and configure the options for the new SQL warehouse. Under "Advanced options" ensure "Unity Catalog" is in the **On** position and click **Create**.
1. In your Databricks workspace, click your username or icon in the top right, click **Settings**, **Identity and access**, and next to the **Service Principals** options, click **Manage**.
2. Click the **Add service principal** button, click **Add new** in the modal, enter a display name and click **Add**.
3. Click on the newly created Service Principal, and under the **Secrets** tab, click **Generate secret**.
4. Enter a lifetime for the secret (e.g., 90 days, 180 days, or 365 days), click **Generate** and make a note of the **Secret** value and **Client ID**.
5. Navigate back to the **SQL Warehouses** section of your Workspace, click the **SQL Warehouses** tab, and select the **SQL Warehouse** you created in **Step 1**. Click **Permissions** in the top right, search for and select the **Service Principal** you created, select the **Can use** permission, and click **Add**.
6. In the Databricks UI, select the **Catalog** tab, and select the target **Catalog**. Within the catalog **Permissions** tab, click **Grant**. In the following modal, select the **Service principal** for which you generated the OAuth token, select `USE CATALOG`, and click **Grant**.
7. Under the target **Catalog**, select the target **schema** (e.g., `main.default`, or create a new target schema). Within the schema **Permissions** tab, click **Grant**. In the following modal, select the **principal** for which you generated the access token, and select either `ALL PRIVILEGES` or the following 9 privileges and then click **Grant**:
* `USE SCHEMA`
* `APPLY TAG`
* `MODIFY`
* `READ VOLUME`
* `SELECT`
* `WRITE VOLUME`
* `CREATE MATERIALIZED VIEW`
* `CREATE TABLE`
* `CREATE VOLUME`
Collect connection information and create an access token for the data transfer service.
1. In the **SQL Warehouses** console, select the SQL warehouse you created in **Step 1**.
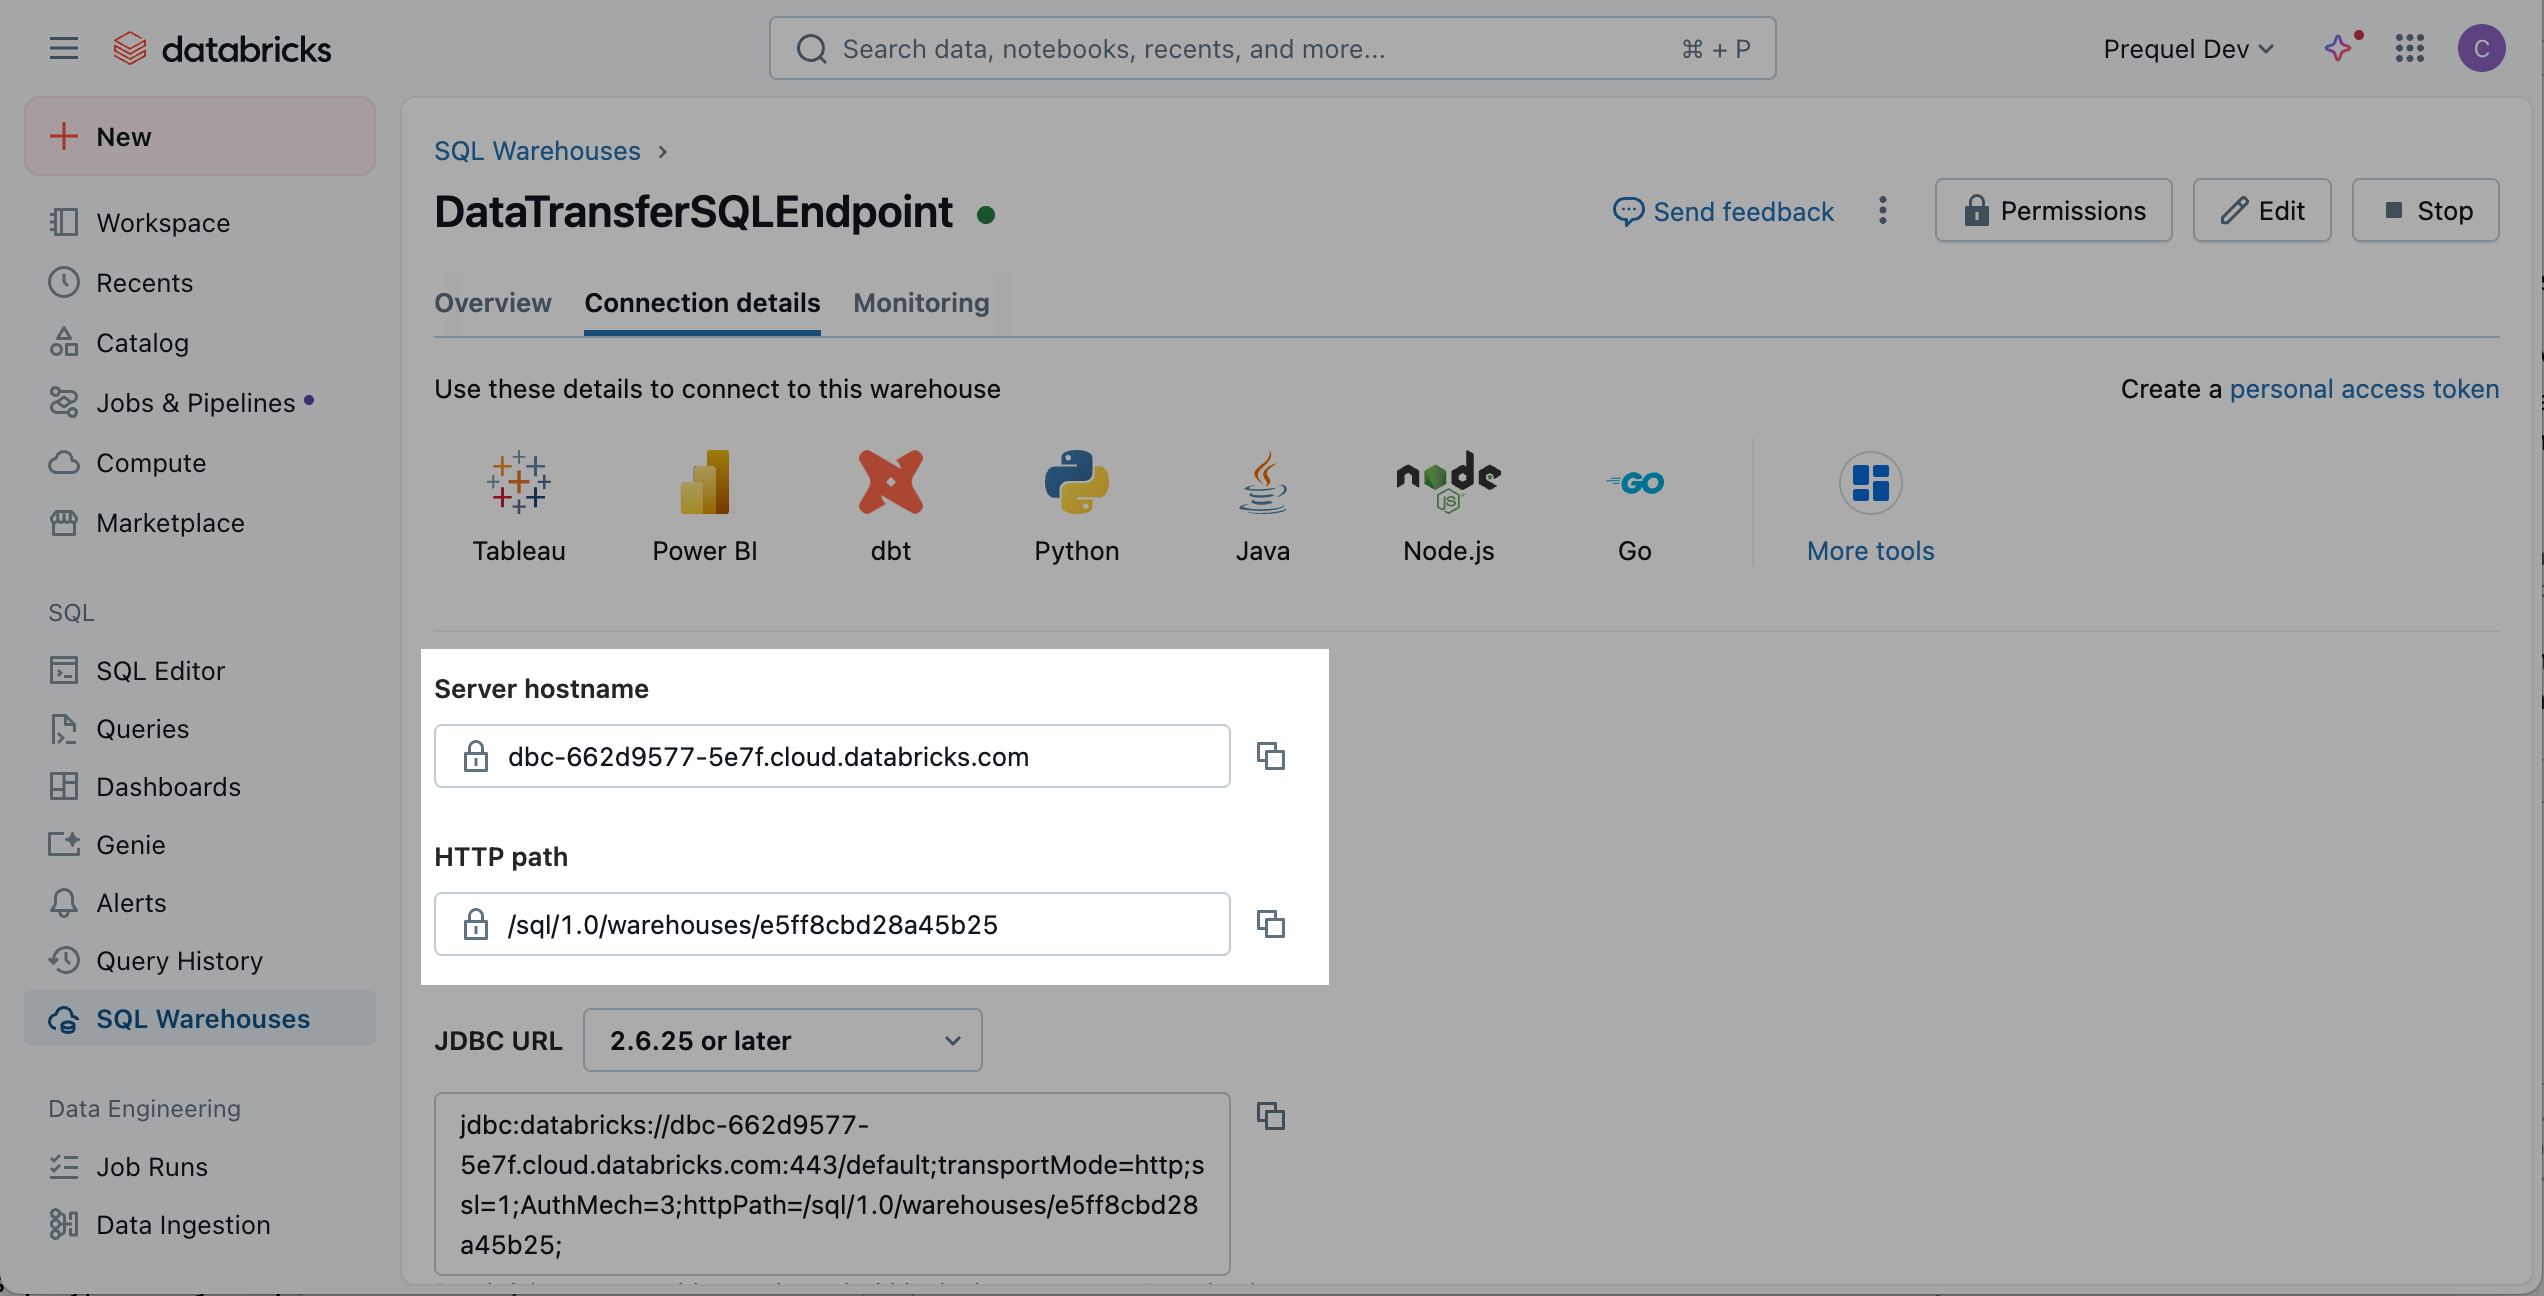
2. Click the **Connection Details** tab, and make a note of the **Server hostname**, **Port**, and **HTTP path**.
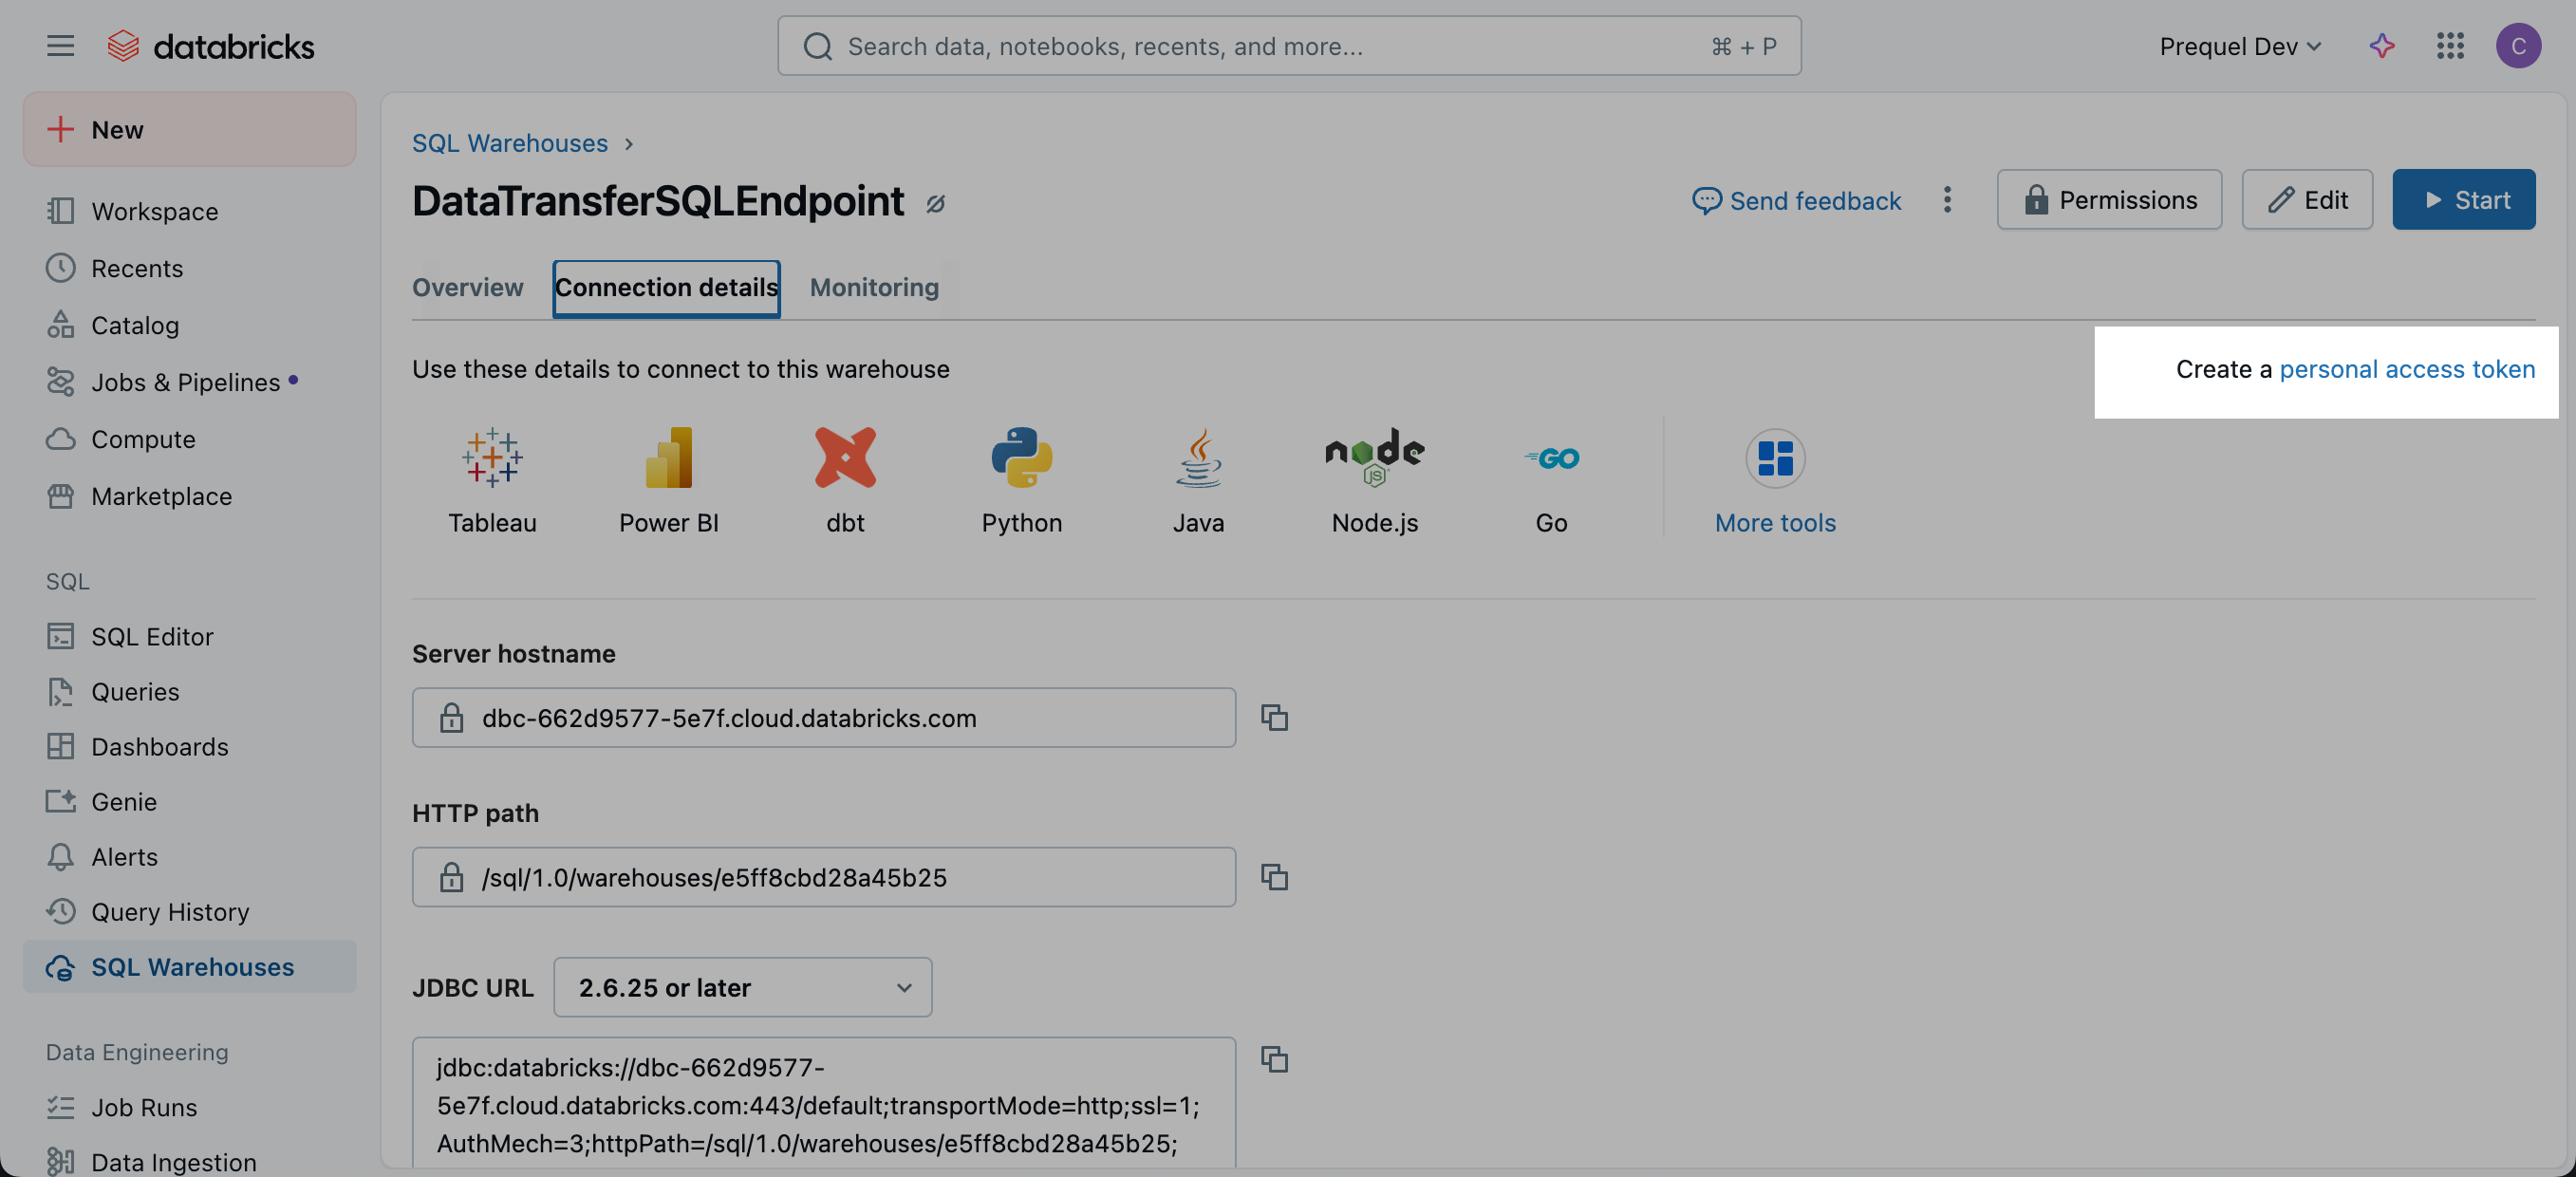
3. Click the link to Create a **personal access token**.
4. Click **Generate New Token**.
5. Name the token with a descriptive comment and assign the token lifetime. A longer lifetime will ensure you do not have to update the token as often. Click **Generate**.
6. In the pop up that follows, **copy the token** and securely save the token.
**Using a Service Principal & a Personal Access Token ("PAT") tied to the Service Account**
You may prefer to create a **Service Principal** with a PAT to use for authentication instead of using your account's Personal Access Token. To do so, use the following steps to create a Service Principal and generate an PAT on behalf of the Service Principal.
1. In your Databricks workspace, click your username or icon in the top right, click **Settings**, **Identity and access**, and next to the **Service Principals** options, click **Manage**.
2. Click the **Add service principal** button, click **Add new** in the modal, enter a display name and click **Add**.
3. Click on the newly created Service Principal, and under **Entitlements** select **Databricks SQL Access** and **Workspace Access**. Click **Update**, and make a note of the **Application ID** of your newly created Service Principal.
4. Back in the **Admin Settings** menu, click the **Advanced** section (under the **Workspace admin** menu). In the **Access Control** section, next to the **Personal Access Tokens** row, click **Permission Settings**. Search for and select the **Service Principal** you created, select the **Can use** permission, click **Add**, and then **Save**.
5. Navigate back to the **SQL Warehouses** section of your Workspace, click the **SQL Warehouses** tab, and select the **SQL Warehouse** you created in **Step 1**. Click **Permissions** in the top right, search for and select the **Service Principal** you created, select the **Can use** permission, and click **Add**.
6. Use your terminal to generate a **Service Principal Access Token** using your Personal Access Token generated above. Record the **token value**. This token can now be used as the access token for the connection.
```bash title="Generate access token" icon="terminal" expandable theme={null}
curl --request POST "https://.cloud.databricks.com/api/2.0/token-management/on-behalf-of/tokens" \
--header "Authorization: Bearer " \
--data '{
"application_id": "",
"lifetime_seconds": ,
"comment": ""
}'
```
7. In the Databricks UI, select the **Catalog** tab, and select the target **Catalog**. Within the catalog **Permissions** tab, click **Grant**. In the following modal, select the **principal** for which you generated the access token, select `USE CATALOG`, and click **Grant**.
8. Under the target **Catalog**, select the target **schema** (e.g., `main.default`, or create a new target schema). Within the schema **Permissions** tab, click **Grant**. In the following modal, select the **principal** for which you generated the access token, and select either `ALL PRIVILEGES` or the following 9 privileges and then click **Grant**:
* `USE SCHEMA`
* `APPLY TAG`
* `MODIFY`
* `READ VOLUME`
* `SELECT`
* `WRITE VOLUME`
* `CREATE MATERIALIZED VIEW`
* `CREATE TABLE`
* `CREATE VOLUME`
**IP Access Lists (optional)**
If your workspace enforces Databricks IP Access Lists, allowlist the static egress IP(s) used by the data transfer service so connections and test sessions can open successfully. See Databricks documentation: [Databricks IP Access Lists](https://learn.microsoft.com/en-us/azure/databricks/security/network/front-end/ip-access-list).
Cloud Hosted (US): `35.192.85.117/32`
Cloud Hosted (EU): `104.199.49.149/32`
If private-cloud or self-hosted, contact support for the static egress IP.
Use the following details to complete the connection setup: **server hostname**, **HTTP path**, **catalog**, your chosen **schema name**, and authentication details.
## Permissions checklist
* Workspace: Service principal or user has permission to use the target SQL warehouse ("Can use").
* Unity Catalog: `USE CATALOG` on the target catalog; appropriate privileges on the target schema (e.g., `USE SCHEMA`, `CREATE TABLE`, and read/write volume privileges as needed), or `ALL PRIVILEGES` on the schema.
* If using Hive Metastore (instead of UC): select `hive` metastore explicitly and configure required object storage staging (bucket and credentials), with write/delete permissions.
* Network: If IP Access Lists are enabled, the static egress IP(s) are allowlisted.
## FAQ
Recommended: OAuth with a service principal. OAuth issues short-lived tokens, scopes access via the principal's entitlements and UC grants, and supports centralized rotation and revocation. Personal Access Tokens (PATs) are supported where policy requires, but they are long-lived bearer tokens and typically inherit broader, user-level permissions.
The connection identity needs `Can use` on the SQL warehouse, `USE CATALOG` on the target catalog, and schema-level privileges to create/manage tables (or `ALL PRIVILEGES` on the schema). Missing `USE CATALOG` is a frequent cause of test-connection failures.
Provide Server hostname, HTTP path, Catalog, Schema, and an OAuth client (service principal) or PAT with warehouse access. Collect host/path from the SQL Warehouses console.
Yes. Unity Catalog is the default. For Hive Metastore, explicitly select `hive` in configuration and supply an S3 staging bucket and credentials. Using the wrong metastore type can cause discovery or permission issues.